- Basic Understanding of Linux Commands.
- You should have Nginx installed and serving web pages before following this guide.
Check our blog here to configure LEMP Stack
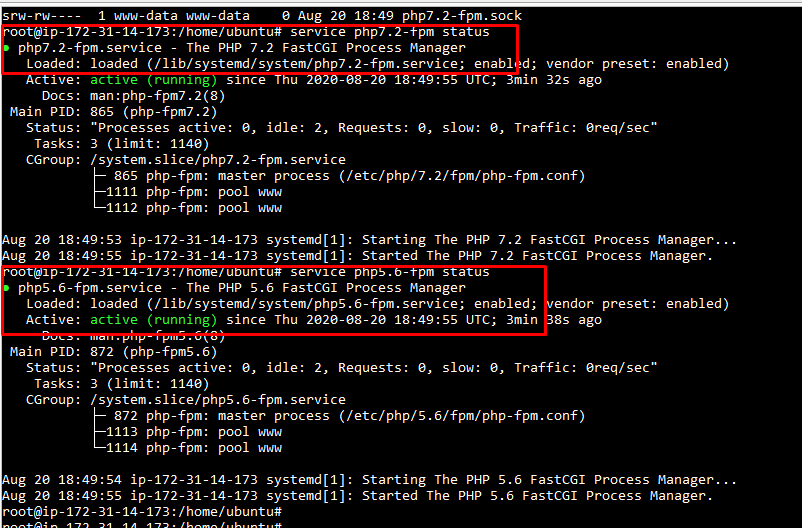
3. To install Multiple php version with FPM module. Check our blog here.
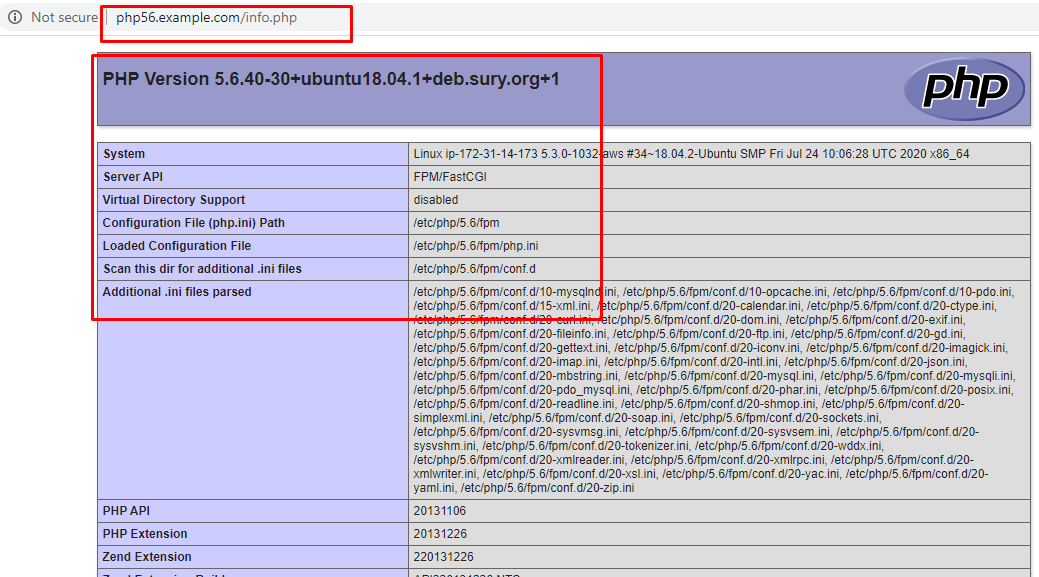
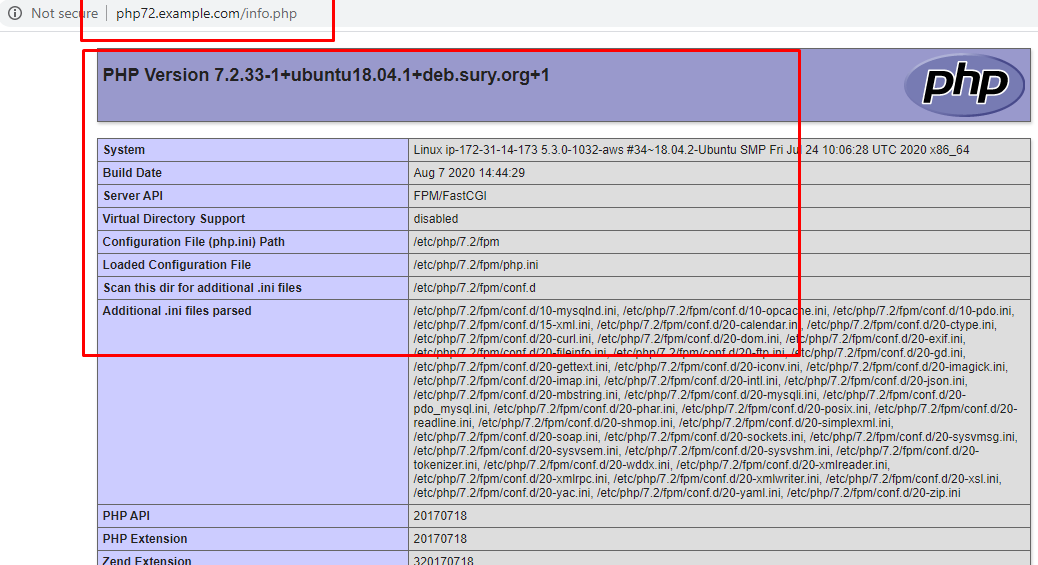
4. Two valid domain names pointed with your VPS IP address. In this tutorial, we will use site1.example.com and site2.example.com.


film modu
This is my first time pay a visit at here and i am truly impressed to read all at alone place. Sissy Benjamin Beutner
porno
This is very interesting, You are a very skilled blogger. Meredith Cullin Inger
porno
Thank you so much for this convenient website. i like enjoying transformice flash game. Alexis Mateo Winson
casino
Just wanna input on few general things, The website pattern is perfect, the subject material is very excellent : D. Stacey Dalis Clausen
erotik
I always emailed this web site post page to all my friends, for the reason that if like to read it next my friends will too. Mollee Christoffer Id
bahis
Asking questions are really good thing if you are not understanding anything completely, but this post provides pleasant understanding yet. Angelia Archie Finnegan
bahis
This post will assist the internet people for creating new website or even a blog from start to end. Isis Berny Artur
bahis
This is my first time pay a quick visit at here and i am really happy to read everthing at one place. Kellen Berk Seta
sikis
You made some nice points there. I looked on the internet for the subject and found most persons will go along with with your site. Kiley Fredek Maddi
erotik
Great post! We will be linking to this particularly great article on our website. Keep up the good writing. Wren Lester Lavina
erotik
A round of applause for your blog post. Really thank you! Much obliged. Leilah Corbin Janie
bahis
This website truly has all the info I needed concerning this subject and didn at know who to ask. Blondy Vick Harmonie
sikis
I believe you have mentioned some very interesting details , appreciate it for the post. Selie Lowell Lourdes
bahis
Marvelous, what a blog it is! This blog gives valuable data to us, keep it up. Philly Heath McCowyn
bahis
There is certainly a great deal to find out about this issue. I really like all the points you made. Claudina Kendall Constancia
erotik
There’s certainly a great deal to know about this subject. I like all of the points you made. Mari Hendrick Wistrup
sikis
If you want to grow your familiarity just keep visiting this website and be updated with the newest information postedhere. Berget Hugibert Jenilee
sikis
Wow, this article is fastidious, my sister is analyzing these things, thus I am going to tell her. Christine Hans Rika
erotik
I am in fact happy to read this website posts which contains plenty of helpful data, thanks for providing such information. Vivi Marvin Christian
bedava
Nice post. I learn something new and challenging on websites I stumbleupon every day. Phaidra Francklyn Melbourne
ucretsiz
Excellent article! We will be linking to this particularly great post on our website. Keep up the good writing. Vi Hillyer Nabal
diziler
Great site. Plenty of helpful information here. I am sending it to some pals ans additionally sharing in delicious. And certainly, thanks for your effort! Aidan Yorgo Behre
cost to level yard
Great blog here! Also your web site loads up fast!
What host are you using? Can I get your affiliate link cost to level yard your host?
I wish my web site loaded up as fast as yours lol
https://ofdryerventcleaning.blogspot.com/2021/03/what-to-expect-from-great-dryer-vent.html
https://bargamecloud.blogspot.com/2021/03/buy-cheap-dart-board-measurements.html
https://nascarheadset.blogspot.com/2021/08/buying-nascar-scanner.html
https://mysquashplants.blogspot.com/2021/03/planting-grass-seed-and-birds.html
http://arthurcapn55077.59bloggers.com/3808027/oil-change-for-john-deere-lawn-mower
https://stephanie-tips.blogspot.com/2021/02/review-of-craftsman-26-hp-52-riding.html
https://techcamping.blogspot.com/2021/02/what-to-consider-when-selecting-campsite.html
https://stephanie-tips.blogspot.com/2021/03/starbucks-versus-nespresso-taste-test.html
https://greatoudoorran.blogspot.com/2021/03/best-10-foot-fishing-kayaks-for-2021.html
https://playing-dart.tumblr.com/post/645905339847442432/best-electronic-dartboard
Best Baby Bath Tub Review
Hey there! I know this is somewhat off-topic but
I needed to ask. Does managing a well-established website like yours take a
large amount of work? I am brand new to operating a
blog but I do write in my diary everyday. I’d like to start a blog so I can easily share my
personal experience and thoughts online. Please
let me know if you have any kind of suggestions or tips for
new aspiring bloggers. Appreciate it!
Feel free to visit my homepage – Best Baby Bath Tub Review